## 一键安装 docker
curl -sSL https://get.docker.com/ | sh
# 或
wget -qO- https://get.docker.com/ | sh
快速安装
yum install -y yum-utils  device-mapper-persistent-data lvm2 && \
yum-config-manager --add-repo http://mirrors.aliyun.com/docker-ce/linux/centos/docker-ce.repo && \
yum install -y docker-ce && \
mkdir -p /etc/docker && \
cat > /etc/docker/daemon.json <<EOF
{
  "registry-mirrors": [
	"https://2h3po24q.mirror.aliyuncs.com",
	"https://dockerhub.azk8s.cn",
	"https://mirror.ccs.tencentyun.com",
	"https://docker.mirrors.ustc.edu.cn"
  ],
  "exec-opts": ["native.cgroupdriver=systemd"],
  "log-driver": "json-file",
  "log-opts": {
    "max-size": "100m"
  }
}
EOF


sed -i 's|SELINUX=enforcing|SELINUX=disabled|' /etc/sysconfig/selinux && \
sed -i 's|SELINUX=enforcing|SELINUX=disabled|' /etc/selinux/config && \


cat > /etc/sysctl.d/docker.conf <<EOF
net.ipv4.ip_forward                 = 1
EOF

sysctl -p /etc/sysctl.d/docker.conf


curl -L https://github.com/docker/compose/releases/download/1.25.0/docker-compose-`uname -s`-`uname -m` -o /usr/local/bin/docker-compose && chmod +x /usr/local/bin/docker-compose && \
systemctl daemon-reload && systemctl enable --now docker && \
docker -v && docker-compose -v

Docker version 19.03.5, build 633a0ea
docker-compose version 1.25.0, build 0a186604
一步一步操作
安装所需依赖
yum install -y yum-utils device-mapper-persistent-data lvm2
添加 docker repo源
# 使用阿里云镜像 repo 源(国内网络环境推荐)
yum-config-manager --add-repo http://mirrors.aliyun.com/docker-ce/linux/centos/docker-ce.repo

# 或使用官方 repo 源
yum-config-manager --add-repo https://download.docker.com/linux/centos/docker-ce.repo
安装 docker-ce
yum install -y docker-ce
确认安装
docker -v
Docker version 19.03.1, build 74b1e89
配置 国内镜像加速
mkdir -p /etc/docker

cat > /etc/docker/daemon.json <<EOF
{
  "registry-mirrors": [
	"https://dockerhub.azk8s.cn",
	"https://mirror.ccs.tencentyun.com",
	"https://docker.mirrors.ustc.edu.cn"
  ],
  "exec-opts": ["native.cgroupdriver=systemd"],
  "log-driver": "json-file",
  "log-opts": {
    "max-size": "100m"
  }
}
EOF
关闭 selinux
# 确认 selinux 状态为 disabled 如果不是需要关闭
sestatus

sed -i 's|SELINUX=enforcing|SELINUX=disabled|' /etc/sysconfig/selinux && \
sed -i 's|SELINUX=enforcing|SELINUX=disabled|' /etc/selinux/config && \
reboot
开启主机报文转发 不开启会导致docker容器里面访问不到外网
cat > /etc/sysctl.d/docker.conf <<EOF
net.ipv4.ip_forward                 = 1

EOF && sysctl -p
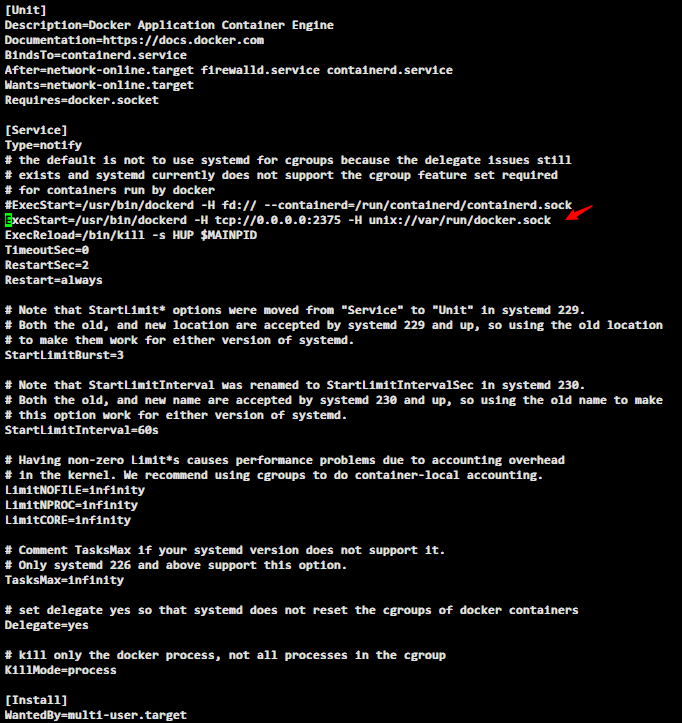
开启2375管理端口 (外网服务器请勿开启 会导致 docker 服务器未授权访问)
vim /usr/lib/systemd/system/docker.service

#修改ExecStart 处为
ExecStart=/usr/bin/dockerd -H tcp://0.0.0.0:2375 -H unix://var/run/docker.sock

重载配置 && 启动 docker && 配置 docker 开机自启
systemctl daemon-reload && systemctl enable --now docker
安装 docker-compose 1.26.2版本
curl -L https://github.com/docker/compose/releases/download/1.26.2/docker-compose-`uname -s`-`uname -m` -o /usr/local/bin/docker-compose && chmod +x /usr/local/bin/docker-compose
确认 docker && docker-compose 安装
docker -v && docker-compose -v
Docker version 19.03.12, build xx
docker-compose version 1.26.2, build xx
测试 docker
docker run --rm hello-world
Unable to find image 'hello-world:latest' locally
latest: Pulling from library/hello-world
1b930d010525: Pull complete
Digest: sha256:c3b4ada4687bbaa170745b3e4dd8ac3f194ca95b2d0518b417fb47e5879d9b5f
Status: Downloaded newer image for hello-world:latest

Hello from Docker!
This message shows that your installation appears to be working correctly.

To generate this message, Docker took the following steps:
 1. The Docker client contacted the Docker daemon.
 2. The Docker daemon pulled the "hello-world" image from the Docker Hub.
    (amd64)
 3. The Docker daemon created a new container from that image which runs the
    executable that produces the output you are currently reading.
 4. The Docker daemon streamed that output to the Docker client, which sent it
    to your terminal.

To try something more ambitious, you can run an Ubuntu container with:
 $ docker run -it ubuntu bash

Share images, automate workflows, and more with a free Docker ID:
 https://hub.docker.com/

For more examples and ideas, visit:
 https://docs.docker.com/get-started/
Done!

